Dan asks: I’m wondering if I need to purchase an 18% gray card for proper exposure. I’ve heard some people use it for video. Is that what it’s for? How would I go about using it? and how will it benefit me? I see some in photo stores for $60 and they have white on the reverse side for white balancing too. Is this a tool worth having?
Answer: Still photographers normally use a gray card for setting or correcting the balance of neutral colors but it can also be used for video.
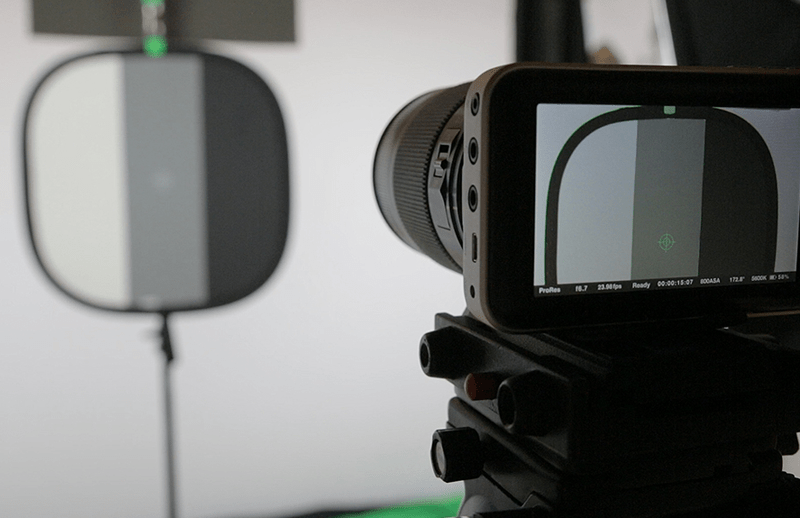
Your video camera can sometimes under or over exposes black and white areas of your video. For example, when your camera is pointed at a bright white area it tends to under expose or darken the shot. When your camera sees a deep black area, it goes ahead and over exposes or lightens up the shot- making your shot turn out all wrong. This is where an 18% Grey card comes in to balance all of that.
Gray is the exact color (actually neutral gray) a camera’s sensors are built to view as the perfect exposure.
Take Control of Exposure with a Gray Card
Purchasing a $60 Grey card is really not necessary. You can meter off of the palm of your hand which is close enough. There is one stop between a Grey card and your palm- meter off that, then add a stop- that’s it. Once you’re done, use that same hand to count the $60 you just saved.
You can also print out this downloadable gray card but you will probably need to experiment with your printer settings of paper type and ink load. Make a small image for testing so that you don’t waste ink, then when you have it right, print it at full size.
Use matte paper for best results.
If you feel more comfortable with a purchased gray card:
- To set your exposure, first make sure the camera’s settings are in manual mode making sure no automatic exposure adjustment is active.
- Now fill the camera’s field of view with the gray card by zooming into it.
- The gray card should be right where the object you are exposing for is positioned.
- Sidelighting – sometimes sunlight comes from the side. In this situation, hold the gray card straight up and down, halfway between the sun and your camera position.
- When using artificial light indoors, hold the gray card halfway between the main light source and the camera position.
- Don’t point the gray card straight at the camera, angle it between the angle of the camera and key light, sort of the like the curve of a face catching a highlight.
- Grey cards need to be at very specific angles in relation to the primary light source, subject and camera before it reflects what it claims to reflect.
- Be sure the lighting on the card is exactly the same as the lighting on the subject. There should not be any shadow on the gray card. The ideal light condition to photograph gray card is under natural light.
- Now turn on the camera’s automatic settings and let the camera adjust to the card.
- Lock the settings.
- Repeat the above whenever your lighting angles change.